|
|
BRITISH AUTOMOTIVE |
|
www.mgbmga.com MGTD Articles |
Technical Information (MGB 4D)
MGB and MGA Front Eye Mount Repair Kits
Last Modified - 9/20/04
British Automotive has introduced two different replacement front eye-mounting kits for both the MGA and MGB composite spring application. These two kits are designated minor and major
It was necessary to introduce these repair kits to satisfy owners who have experienced unusual composite spring front bushing wear characteristics with MGA DESIGN 2 and MGB DESIGNS 3, 4 or 5 as outlined further on in this article.
It
would appear that the rear shackle eye design is satisfactory, therefore, no
upgrades are being considered at this time.
In
regard to the above, we have looked into the cause(s) of these conditions, and
concluded that lateral movement of the rear axle assembly is the primary cause
for both of these problems. This movement is further exaggerated through
aggressive driver techniques.
Of
a secondary nature, during the composite spring installation process, we have
always indicated the importance of deburring and smoothing the inner surfaces
of the front spring mounting abutments. I am not too sure exactly how many
installers bother to take notice of this point.
I
would like to point out that we have always, as outlined in the appropriate
technical article(s), recommended the installation of a panhard rod assembly
(MGB tube axles only) to compliment the installation of composite springs. When
installed, this component virtually eliminates the lateral rear axle movement
as outlined above.
______________________________________________
MGA AND MGB
REPAIR KIT (MINOR)
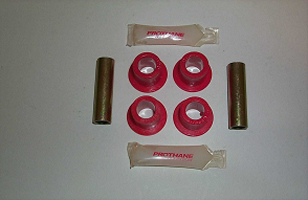
P0002715
The
above kit, part number MINOR/KITA or MINOR/KITB is applicable
to the designs below:
MGA Design 2.
MGB Designs 3. 4. & 5
The
kit contains the following:
2 -
.565" OD x .447" ID x 2" (MGA) Insert tubes.
OR Part
Number BUSH/TUBE
2 -
,565" OD x .447" ID x 2.125" (MGB) Insert tubes
4 -
Replacement polyurethane insert bushings. " " U-61120-RD
2 -
Prothane Teflon lube tubes. " " TEF/LUBE
_______________________________________________
MGA & MGB
INSTALLATION INSTRUCTIONS (MINOR)
NOTE:
To carry out this operation, it is not necessary to remove the entire composite
spring assembly from the vehicle. However, if the split shouldered Delrin
bushings have not been further secured within
their respective front eyes, or if the Delrin bushings need to be replaced, we
highly recommend their removal. Further information follows in this article.
To
allow for full rear axle defection, in all probability, it will be necessary to
remove the rear section of the exhaust system.
Upon assembly
be sure to liberally coat all bushings, tubes and hardware with the supplied lubricant. This includes
the rear spring shackle as well.
During
installation, do not overtighten hardware. Final tightening should be carried
out with vehicle on the ground, ramps or such.
__________________________________________
1.
Jack up vehicle and place axle stands slightly forward of the front spring
mounting abutment.
2.
Lower vehicle down until the axle is supported by the axle check straps.
3.
Remove road wheels.
4.
Remove rear section of exhaust.
5.
Raise rear axle and remove axle check straps.
6.
Lower rear axle to allow for full axle deflection.
7.
Working with one side only, reposition jack to one side of the axle tube, and
support.
8.
Remove both the shackle pin assembly and front spring eye hardware.
9.
Lower jack until front spring eye is clear of mounting abutment.
10.
Remove old polyurethane bushings and tube. Install new bushings and tube.
11.
Re-install both the shackle pin assembly and front spring eye hardware.
12.
Position jack to the other side of the axle tube, and continue with same.
Reverse
operations 1 thru 12.
___________________________________________
MGA FRONT
SPRING EYE DESIGNS
Over
the years there has been only two MGA composite front spring eye design
changes. These are as follows:
DESIGN
1. Split .0625" shouldered Delrin bushings with OEM silent block bushing
inserted within.
NOTE: This type of bushing must be secured
with 2- 1/4" SAE x 7/16" Allen
drive set screws. Use
either drill bit #3 (.213") or 7/32" (.2187").
DESIGN
2. Split .0625" shouldered Delrin bushings with polyurethane insert
bushings
(Current design)
NOTE: Delrin bushings must be secured within the front eye with the addition
of 1/4" SAE x
5/16" Allen drive set screws, or 3/16" x 5/16" split roll pins.
________________________________________________________
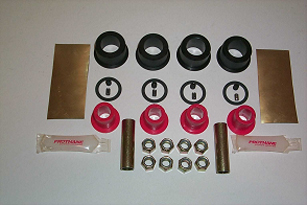
MGA REPAIR KIT
(MAJOR)

P0002725
NOTE:
The above kit, part number MAJOR/KITA, is applicable to both
DESIGN 1 & DESIGN 2.
This
kit contains the following:
4 -
.0625" split shouldered Delrin support bushings.
4 -
1/4" SAE x 5/16" Allen drive set screws.
4 -
3/16" x 5/16" Split roll pins.
4 -
Replacement polyurethane insert bushings.
4 -
.007" Brass shim stock.
2 -
.565" OD x .447" ID x 2" Insert tubes.
8-
3/8" SAE grade 8 nyloc nuts.
2 -
Prothane Teflon lube tubes.
MGA
INSTALLATION INSTRUCTIONS (MAJOR)
The
following instructions should be read in conjunction with the appropriate
section of the MGA workshop manual covering rear road spring replacement.
With
the composite spring removed from the vehicle carry out the following:
1 -
Remove any securing hardware as indicated in DESIGN 1 or DESIGN 2 above.
2 -
Remove either DESIGN 1 OEM silent block bushing, or DESIGN 2 insert tubes and
polyurethane insert bushings, from the
spring eye.
3 -
Along with a small hammer, use a putty knife between the shoulder of the split
Delrin
bushing and spring eye. Tap around the
periphery of the Delrin bushings to force
them out of the spring eye.
4 -
If fitted, remove existing brass shim stock .007" from within the spring
eye.
5 -
Using coarse sandpaper thoroughly cleanup any epoxy within the spring eye. The
inner surface must be smooth before
installing new bushings.
6 -
Trial fit new bushings within the spring eye.
7 -
If required, wrap .007" brass shim stock around Delrin bushings. Insert
bushings
into spring eye with the gap facing the
spring blade. Be careful not to distort brass
shim stock. Use of a soft jawed bench
vise would be ideal to press the Delrin
bushings into position.
8 -
If your original Delrin bushings were secured with 1/4"SAE x 5/16"
Allen drive set
screws, you will need to re-drill through the brass shim stock
(if fitted) and
completely through the Delrin bushings.
#3 (.213") or 7/32" (.2187") drill bit.
Using 1/4" SAE (28 TPI) tap, tap
all the way through the Delrin bushings.
9 -
Apply loctite to the new set screws and install.
10
If your original Delrin bushings were secured with 3/16" x 5/16"
split roll pins, simply
drill 3/16" through the brass shim
stock (if fitted) and completely through the Delrin
bushings.
11 Drive
in new roll pins until flush with outer spring eye surface.
12
Before installing new polyurethane bushings, tubes, and assembling rear shackle
assembly, apply supplied lubricant
liberally.
NOTE:
If your original Delrin bushings have not been further secured with
additional
hardware, proceed as follows:
Measure
3/8" in from either side of the underside of the spring eye, that is the
side facing the ground, center punch location and use 1/16" pilot drill
followed by 3/16" drill. Remember to drill all the way through the Delrin
bushings. Drive in supplied 3/16" x 5/16" split roll pins until flush
with the outer spring eye surface.
________________________________________________
MGB REPAIR KIT
(MAJOR)
P0002723
The
above kit, part number MAJOR/KITB, contains the following:
4 -
.0625" shouldered Delrin front eye support bushings
4 -
Fiber spacer washers 7/8" ID x 1.3/16" OD x 031" thick.
4 -
3/16" x 5/16" Split roll pins.
4 -
Replacement polyurethane insert bushings.
4 -
.007" Brass shim stock.
2 -
.565" OD x .447" ID x 2.1/8" Insert tubes.
8 -
3/8" SAE grade 8 nyloc nuts.
2 - Prothane Teflon lube tubes.
_______________________
MGB FRONT
SPRING EYE DESIGNS
Over
the years there have been various changes in the MGB front spring mounting
design, these changes can be identified as follows:
DESIGN
1…… OEM silent block bushing.
DESIGN
2…… Split polyurethane bushings with 7/8" OD pin.
DESIGN
3…… Split .125" shouldered Delrin bushings with 7/8" OD pin.
DESIGN
4…… Split .0625" shouldered Delrin bushings with .0625" thrust
washers and
7/8" OD pin.
DESIGN
5…… Split .0625" shouldered Delrin bushings with .031" fiber spacer
washers
along with
polyurethane insert kit. (Current design)
NOTE:
We are unable to match a particular design with a designated composite spring
identification number.
_____________________________________________
MGB
INSTALLATION INSTRUCTIONS (MAJOR)
The
following instructions should be read in conjunction with the appropriate
section of the MGB workshop manual covering rear road spring replacement.
With
the composite spring removed from the vehicle carry out the following:
DESIGN
1 …. This OEM bushing was secured within the spring front eye with epoxy and,
possibly with additional hardware.
NOTE:
The replacement polyurethane bushing (Moss Motors 267-525) has a larger OD than
the OEM bushing, therefore, this type of bushing can not be retrofitted.
1…
If fitted, remove the 1/4" SAE x 5/16" Allen drive set screws.
2…
Press out the old OEM silent block bushings.
3…
Thoroughly clean out any remaining epoxy within the front eye. Check Delrin
bushings for interference fit. If they
appear loose, wrap .007" brass shim stock
around bushings.
4…
Insert bushings into spring eye with the gap facing the spring blade. Use a
soft
jawed bench vise to press home the
Delrin bushings. Be careful not to distort the
.007" shim stock as you proceed.
5…
If the front eye was fitted with additional hardware as mentioned above, you
will
need to drill completely through the
shim stock and Delrin bushings. Use a #3
(.213") or 7/32" (.2187")
drill bit, followed by a 1/4" SAE (28 TPI) tap.
6…
Apply a small amount of locktite to the new setscrews, and install.
NOTE:
The next instruction only applies if no additional hardware was used, on the
spring eye, to secure the OEM bushing.
1….On
the underside of the spring eye, mark and center punch 2 locations, 3/8"
in from either edge of the spring eye.
2…
Using 1/16" pilot drill bit, drill all the way through the spring eye,
brass shim stock (if fitted) and Delrin bushing. Follow this up with a
3/16" drill bit.
3…
Insert 3/16" stainless steel roll pins. Tap into the spring eye until
level with the spring eye surface.
-------------------------------------------------------------------------
DESIGN
2
1
…. Along with a small hammer, use a putty knife between the shoulder of the
split
polyurethane bushing and the spring
eye. Tap around the periphery of the
polyurethane bushings to force them
out of the spring eye.
2
…. Using coarse sandpaper thoroughly cleanup any epoxy within the spring eye.
The
inner surface must be smooth before
installing new split Delrin bushings.
3
…. Trial fit new Delrin bushings within the spring eye.
4
…. If required, wrap the .007" brass shim stock around the Delrin
bushings. Insert
bushings into spring eye with the gap
facing the spring blade. Be careful not to
distort brass shim stock. Use of a
soft jawed bench vise would be ideal to press the
Delrin bushings into position.
NOTE:
The new Delrin bushings must be additionally secured within the spring eye with
the use of 3/16" x 5/16" split roll pins
5
…. On the lower portion of the spring eye, mark and center punch 2 locations,
3/8" in
from either edge of the spring eye.
6
…. Using 1/16" pilot drill bit, drill all the way through the spring eye,
brass shim stock
(if fitted) and Delrin Bushing Follow this up with a 3/16" drill bit.
7
…. Insert 3/16" stainless steel roll pins. Tap into the spring eye until
level with the
spring eye surface.
8
…. Before installing new polyurethane bushings, tubes, and before assembling
rear
shackle assembly, apply supplied
lubricant liberally.
___________________________________________
DESIGN
3 4 & 5
NOTE:
Please follow earlier instructions as found under the heading "MGA INSTALLATION INSTRUCTIONS
(MAJOR)"
To
thoroughly familiarize yourself with the technical information contained in
this article, I recommend the text be read several times.