|
|
BRITISH AUTOMOTIVE |
|
www.mgbmga.com MGTD Articles |
Technical Information (MGB 13)
Telescopic Shock Absorbers
Last Modified - 5/20/00
If you are converting your OEM rear shock absorbers to the telescopic type, please take a moment to read the following information.
Due to the varying degree of ride heights, precautions must be taken to ensure that the shock absorber, when fitted to the vehicle, will work within the working dimensions given below.
Under bump conditions the MGB rear suspension travel is limited by the axle bump stop. Under full rebound conditions the travel is limited by the axle check strap. This distance is approximately 5-1/2" to 6". The OEM shock absorbers has approximately 7-1/2" of travel, which is more than adequate to accommodate this movement.
The ideal mounting position for installing telescopic shock absorbers is vertical. Unfortunately, on the MGB this ideal position cannot be achieved without major modification to the body. The installed angle of the tube shock absorber varies with rear suspension ride heights and is consistently changing throughout suspension travel. Bump increases the working angle and rebound reduces the working angle. On the MGB this installed angle can be as much as 20 - 25 degrees. Please remember, shock absorbers become less effective as their angle increases.
DIMENSIONS |
British Automotive (P/N VBPBA1) |
KONI (P/N 80-1244) |
SPAX (P/N G41AV-170) |
Monroe Sensatrac (P/N ST-5877) |
Compressed length |
10.0" |
10.5" |
10.625" |
10.25" |
Extended Length |
15.875" |
16.5" |
16.125" |
15.875" |
Working length |
5.875" |
6.0" |
5.5" |
5.625" |
Installed height (ideal) |
12.9375" |
13.5" |
13.375" |
13.065" |
Bump stop travel |
2.9375" |
3.0" |
2.75" |
2.812" |
Rebound travel |
2.9375" |
3.0" |
2.75" |
2.812" |
Installation of these shock absorbers is critical. Damage will occur if the following instructions are not followed.
1 - Before
removing your OEM shock absorbers from your vehicle (note: vehicle on level
ground) measure from the shock absorber center pivot to the lower shock
absorber link attachment bracket. Add 3" to this measurement. This additional
3" allows for the upward offset (1") of the new upper mounting bracket and the
downward offset (2") which is caused by switching these attachment plates from
side to side. This total will be the INITIAL INSTALLED HEIGHT.
NOTE: The switching from side to side of these attachment brackets (shock absorber mounting brackets) is common with these later shock absorber kits. See information on British Automotive heavy duty lower mounting bracket at the end of this article.
1A - Alternatively, you can remove the OEM shock absorber and link assembly, and temporarily attach the upper shock absorber bracket to the frame. Measure in the same manner.
2 - Measure the distance between the bump stop and the bump stop plate, add 0.250" for minimal bump stop compression. This distance cannot be more that the INITIAL INSTALLED HEIGHT minus the shock absorbers COMPRESSED LENGTH.
3 - Subtract the shock absorber COMPRESSED LENGTH from the INITIAL INSTALLED HEIGHT. This measurement must be greater than the distance between the bump stop and the bump stop plate plus 0.250"; i.e., this measurement must be greater than the measurement in item 2.
Next jack up the vehicle and support the vehicle with axle stands placed under the body just ahead of the road spring front mount. The axle should be fully suspended and held by the check straps only. Make sure that the exhaust system is not preventing the axle from achieving this position.
4 - Remeasure as in item 1.
By inserting actual measurements we recorded during installation, we hope to clarify the installation. The example below uses KONI shock absorbers.
Measurement as found in item 1: 13"
Measurement as found in item 2: 2.75" (2.5"+0.25")
Measurement as found in
item 3: 2.5" (13"-10.5")
Reviewing our statement that item 3 must be greater than 2 - we must increase item 3 or risk certain damage to the shock absorber under bump conditions. We do this by installing a 1/2" spacer block between the lower shock absorber mounting plate and the road spring. This will in effect increase the measurement described in item 1 and increase the measurement in item 3 to 3".
New measurement item 1: 13.5"
New
measurement item 2: 3" (13.5"-10.5")
NOTE: Part# S/ABS.KIT and Part# S/ABS.MKIT contain these 1/2" spacer blocks.
And, the rebound situation:
Measurement recorded in item 4 will be the extended length of the installed shock absorber and must be less than the given dimension of 16.5". The axle check strap lengths should be the controlling factor and should be supporting the axle, and not the shock absorber.
Listed below are the readily available check straps:
| AHH6355 | (267-565) | 8.5" |
| AHH5081 | (267-610) | 9.0" |
| BHH989 | (267-615) | 9.5" |
These are the only check straps, of this particular design, that I have come across. Strap type check straps are more common on other vehicles. We have been using Volvo check straps and cutting them to length. There are two different lengths 10.1875" and 15" sold under the same Volvo part number 672251. Once you have cut the strap to the length you need, simply drill one new locating hole.
Once you have installed the check straps you can now measure the distance between the bump stop and the bump stop pedestal this will become your controlled suspension movement distance and should approximately 5.5" to 6.0".
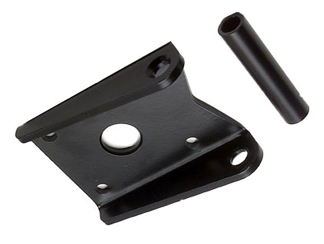
We have discovered that switching the lower
shock absorber mounting brackets to be inadequate. The problem with this
seemingly simple change from side to side is that the bracket itself will splay
outward at the point where the shock absorber attaches. Also, the bracket does
not have a chamfer on the center locating hole. Therefore, this bracket will
not register on the lower spring locating bracket. In March of 2000 we
rectified this problem by redesigning the bracket. This redesigned bracket is
much stronger than its predecessor (see illustration below).
PRICES
| Without modified lower bracket (Part# S/ABS.KIT) | $159.95 |
| With modified lower bracket (Part# S/ABS.MKIT) | $225.00 |
OEM Lower Bracket

Modified Lower Bracket
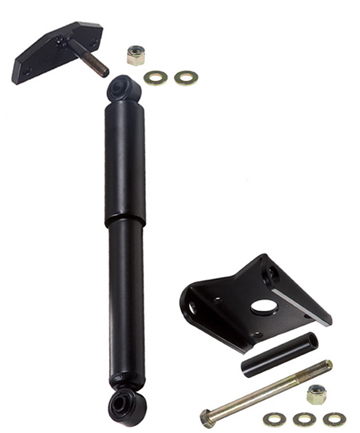
Modified Rear Telescopic Shock Absorber Kit
WARNING! WARNING! WARNING!
Be aware that the VBPBA1 shock absorbers contain no internal bump stop. Therefore, correct installation is critical to the life of the shock absorbers. Refer to this technical article (MGB 13) at all times.
Shock absorbers damaged due to incorrect installation will not be accepted for return under our warranty.
Before installing VBPBA1 shock absorbers carry out the following instructions per the manufacturer, KYB:
With the shock absorber in the vertical position, fully compress each shock absorber and then allow the unit to completely extend. You made need to assist this action by pulling slowly downward. This procedure should be repeated at least 6 times.
KYB's explanation is as follows:
During shipment it is almost certain that the shock absorbers will not remain in the vertical position. This situation leads to unequalization of the nitrogen head pressure that, when fitted in the intended vertical or near vertical position (22 degrees approx. on the MGB), will self-equalize.
You might ask, "Couldn't I just simply install the shock absorbers and let the suspension movement take care of the problem?" The answer is a emphatic "No"! Until the nitrogen head pressure is equalized you have no or very little dampening effect. This would be equivalent to sending the customer out of the shop with no shock absorbers installed at all.
If you ignore KYB's recommendations, there is no guarantee how long this equalization will take. Furthermore, the ramifications of driving your MGB or MGA without properly installed shock absorbers are potentially severe. We can't emphasize enough how important it is that you follow the preceding instructions.